
Customize the WordPress admin
This tutorial is about different ways you can customize the WordPress admin, either for yourself or your clients. Not all of the methods covered in the tutorial will be relevant to every project. You'll need to decide which make sense for your individual clients. Check? Check! One of the (many) great things about WordPress is how easy it is to customize and extend. If there is something in the admin you're not using, chances are it's pretty easy to remove. As a part of my build process when cr
This tutorial is about different ways you can customize the WordPress admin, either for yourself or your clients. Not all of the methods covered in the tutorial will be relevant to every project. You'll need to decide which make sense for your individual clients. Check? Check!
One of the (many) great things about WordPress is how easy it is to customize and extend. If there is something in the admin you're not using, chances are it's pretty easy to remove.
As a part of my build process when creating new WordPress sites, I like to tailor the admin area to my clients needs. This includes removing anything that isn't relevant to the day-to-day operation of the site.
In this tutorial we're going to cover customizing the following key areas of the WordPress admin:
- Login page
- Dashboard
- Widget Manager
- Admin Menu
- Customizer
- Post Editor
Then we'll look at how you can:
- Replace the default editor
- Remove all traces of the blog
I'd recommend that you put all your admin customization's into it's own, which can easily be disabled if needed. This is not intended to be used as is, but rather as an example for your own customization.
Download the example plugin here
Things to consider before jumping in
Does your client need access to instructional videos? If so, going crazy on the admin might not be a good idea. At least until they have gotten the hang of using WordPress.
Communicate what you're doing to the client. This doesn't mean going into the technical implementation, but rather letting them know what you're changing and including details instructions about what was changed where in your handover document.
Is this something the client might need down the line? This includes things like back-end tools, widgets, etc.
Does the client need/want the option to update these later. In which case, a custom options page would be needed.
For my own personal projects, I generally go to town on the admin, limiting it to the bare essentials. Then if I ever need something that's been disabled, I just head over to my custom site plugin and comment out the relevant block of code.
Customize the WordPress admin login
While there is a lot you can do with plain old css, when it comes to customizing the WordPress login page, there is no point in reinventing the wheel when there is the awesome Login Designer plugin, created by Rich Tabor from ThemeBeans.com.
Login Designer is the only plugin I've come across that takes full advantage of the WordPress Customizer, with live preview, context specific options - all making it really easy to customize the included templates.
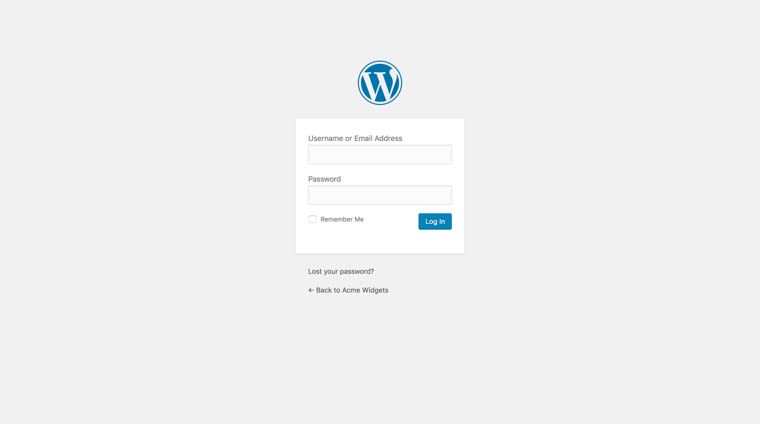
Here is how the default WordPress admin login page looks:
...and this is what the login page looks like after five minutes in Login Designer:

Pretty neat, eh? Simply install and activate the plugin, then head over to the Appearance > Login Designer page. Pick a template then click around the preview area to open the contextual options.
Customizing the dashboard
Next, let's customize our WordPress dashboard. Being that it's the first thing that your client sees when they login (unless you specify otherwise), it has the potential to give your client a birds-eye view of their site if setup properly.
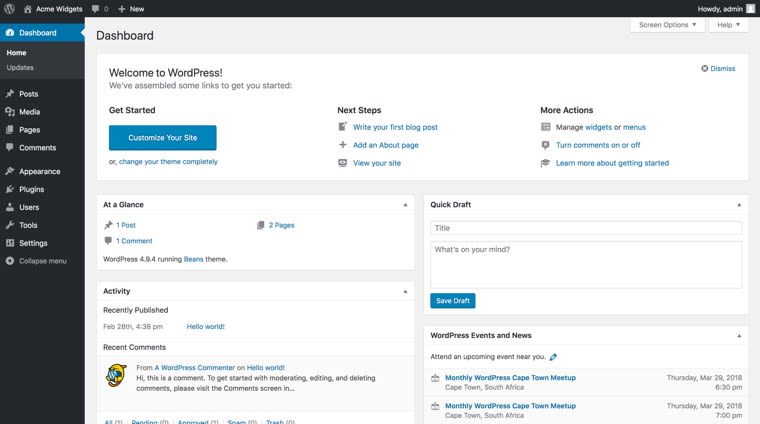
This is how our dashboard looks before we've made any changes.
Remove the welcome panel
The first thing we'll want to remove is the welcome panel that is displayed at the top of the dashboard.
Luckily, removing it is simply a case of adding the following snippet to your admin customization plugin:
<?php

remove_action( 'welcome_panel', 'wp_welcome_panel' );
Copy
Removing dashboard widgets
Next we'll remove some of the default widgets that come preloaded on all standard WordPress installs. There are two ways this can be done.
The first is via the Screen Options button on the top right side of the dashboard. This will simply hide the widgets and can be configured on a per user basis. This is useful for widgets that are enabled for specific users.
The second method is to remove the widget completely and this can be done via the theme or plugin. Personally I feel it makes more sense in your sites custom plugin, as it's not related to the front-end of the site.
The widgets we're going to remove are:
- Activity
- Quick Post
- WordPress Events
To do so, we'll add the following function to our admin customization plugin:
<?php

/* Remove dashboard widgets. */
function example_remove_dashboard_meta() {

    // Remove for all except admins.
    if ( ! current_user_can( 'manage_options' ) ) {

        // Remove the activity widget
        remove_meta_box( 'dashboard_activity', 'dashboard', 'normal');

    }

    // Remove for everyone.
    remove_meta_box( 'dashboard_primary', 'dashboard', 'normal' );

    // Quick Draft
    remove_meta_box( 'dashboard_quick_press', 'dashboard', 'side' );

}
add_action( 'admin_init', 'example_remove_dashboard_meta' );
Copy
The first remove_meta_box() item is wrapped in a condition that checks whether the logged in user has permissions to manage_options (aka, is this user an admin or have they been assigned admin permissions).
Adding a custom dashboard widget
Adding a custom widget to the dashboard can be a useful way of giving the client direct access to things like documentation, help videos, style-guide, etc.
In the example below, we'll create a custom widget with a few useful links via our site plugin.
Normally, we'd use the core wp_add_dashboard_widget() function to add our custom dashboard widget, but this does not support assigning a position for the widget (which may not always be desirable) so we'll use the add_meta_box() function instead.
Step 1: Register the dashboard widget
<?php

function example_dashboard_setup_function_using_metabox() {

    // Get the current logged in user.
    $current_user = wp_get_current_user();

    // Grab the users first name.
    $name = $current_user->user_firstname;

    // Let's add our new dashboard widget!
    add_meta_box(
        'example_hello_world_widget',
        'Welcome back, ' . $name . '',
        'example_hello_world_widget_output',
        'dashboard',
        'side',
        'high'
    );

}
Copy
The first block grabs the current logged-in user and stores the persons first name in a variable, that we'll use to output their name in the widget title.
Then we register the custom admin widget using the add_meta_box() function.
The first parameter is the widget id (in this case "example_hello_world_widget_output")
The next is the widget title (where we're outputting the users name)After that we specify the meta box type (in this case dashboard)And lastly we set the meta box position to "side" with a priority of "high".This will set our admin widget to the top of the right widget position.
Step 2: Output the widget content
Next, we're going to create a function to output our widget content.
<?php

function example_hello_world_widget_output() { ?>
    <ul style="overflow:hidden;margin:0;">
        <li><a href="#">Backup the site</a></li>
        <li><a href="#">Send a newsletter</a></li>
        <li><a href="#">Report a bug</a></li>
    </ul>
    <?php
}
add_action( 'wp_dashboard_setup','example_hello_world_widget_output' );
Here we're adding our list of useful links for our client, thought this could be anything you want.
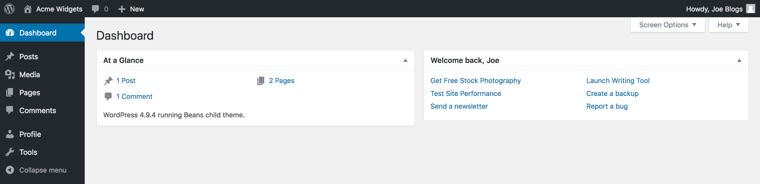
Now if we head over to our dashboard, we should see this:
Note: Feeling lazy? Check out MetaxBox.io and give their Meta Box Generator a try!
Useful dashboard widgets
Now if we want to take things further, we can extend our WordPress dashboard even more using a few dashboard specific plugins. Here is a list of my favorites:
Google Analytics
While there are loads of Google Analytics plugins on WordPress.org, most of them either have their own interface (outside of the dashboard) or require you to install additional plugins. The Lara Google Analytics plugin however gives you a nice, comprehensive overview of your sites performance and has a free version.
Check out the Google Analytics plugin on WordPress.org
WP Statistics
Unlike the plugin above, WP Statistics does not rely on any third-party services (like Google Analytics). The other nice feature of this plugin is that it outputs individual widgets for each of the different tracking metrics, allowing you to cherry-pick the metrics that are most important to your client.
Check out the WP Statistics plugin on WordPress.org
Statify
Check out the Statify plugin on WordPress.org
Like WP Statistics, Statify provides a straightforward and compact access to the number of site views. It is privacy-friendly as it doesn't use cookies or a third party services.
Check out the Statify plugin on WordPress.org
Dashboard Contact Form
Another useful addition to your clients dashboard is a simple contact form, with yourself set as the recipient, making it quick and easy for the client to report issues, share feedback, etc.
Check out the Dashboard Contact Form plugin on WordPress.org
Dashboard Feed
The last dashboard widget plugin I'm going to mention is the Dashboard Feed. This can be used to pull in related industry news or as a way for you to communicate with all your clients directly from their dashboards. For example, adding an RSS feed from a specific (Client News) category feed on your blog, on which you post updates that are relevant to all your clients.
For example, "Gutenberg, the new writing experience is WordPress is coming soon - here's everything you need to know". Obviously this approach would not be your only means of communicating, as there is no guarantee you're client will login into their site anytime soon, but it's good to have multiple channels of communication.
Check out the Dashboard Feed plugin on WordPress.org
Removing widgets from the Widget Manager
Next we're going to remove a bunch of the default widgets that we have established aren't needed.
Let's say we want to get rid of the pages, calendar, links, meta, comments, rss and akismet widgets - we can easily remove them by hooking into widgets_init() using the core unregister_widget() function, which takes the widget class name as the only parameter.
<?php

/* Remove any unused widgets. */
function example_remove_default_widgets() {
    unregister_widget('WP_Widget_Pages');
    unregister_widget('WP_Widget_Calendar');
    unregister_widget('WP_Widget_Links');
    unregister_widget('WP_Widget_Meta');
    unregister_widget('WP_Widget_Recent_Comments');
    unregister_widget('WP_Widget_RSS');
    unregister_widget('Akismet_Widget');
}
add_action('widgets_init', 'example_remove_default_widgets', 11);
add_action( 'beans_before_load_document', 'example_remove_default_widgets');
Copy
I've included line items for each of the core widgets in the example plugin, so simply un-comment the widgets you want to keep.
Here is a before and after comparison:
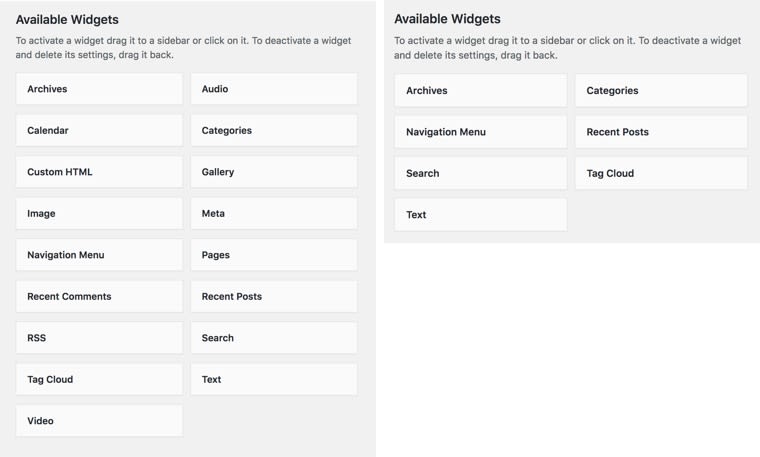
Note: I hid the widget descriptions using css to fit all the widgets in the screenshot.
Customizing the WordPress admin menu
Next we're going to look at the different ways we can customize the WordPress admin menu.
The first option is to use a plugin. I personally try keep my use of third-party plugins to a bare minimum, if that's the approach you prefer try the Admin Menu Editor plugin.
The second method (my preferred) is to customize the admin menu via my sites plugin, with the rest of my admin customization's.
Here's how we remove menu items
For this example, let's remove the Tools parent menu item, along with the sub-items for the Importer (which the client will never need) and the Editor.
<?php

    /* Remove unnecessary menu items from the admin menu. */
    function example_edit_admin_menus() {

        global $menu;

        // Removes the Tools parent item
        remove_menu_page('tools.php');

        // Removes the Import & Export child menu item
        remove_submenu_page('tools.php', 'import.php');
        remove_submenu_page('tools.php', 'export.php');

    }
    add_action( 'admin_menu', 'example_edit_admin_menus' );
Copy
Removing options from the WordPress Customizer
While the Customizer can be used as a simple, visual way for your client to update different parts of their site, I always like to remove anything that's not being used, so only the areas we've specified that needs to be customization are displayed.
Below is an example of function, were I'm removing the header image upload, blog description, header text, colors, background image, front-page page selection and the custom css editor.
<?php

// Clean up the Customizer
function example_customize_register( $wp_customize ) {

    global $wp_customize;
    $wp_customize->remove_control( 'header_image' );
    $wp_customize->remove_control( 'blogdescription' );
    $wp_customize->remove_control( 'display_header_text' );
    $wp_customize->remove_section( 'colors' );
    $wp_customize->remove_section( 'background_image' );
    $wp_customize->remove_section( 'static_front_page' );
    $wp_customize->remove_section( 'custom_css' );
}
add_action( "customize_register", "example_customize_register", 11 );
Copy
Now our client will only see the customizer options for things they want to be able to customize. Winning!
FYI: Beans also makes it pretty easy to add custom options to the Customizer - check out the related docs on the Beans site.
Removing meta boxes
As the last step before we look at some third-party plugin to take our customization efforts even further, let's first look at how we can remove any meta boxes that aren't being used. In case you don't know, meta boxes are the panels that are displayed throughout the WordPress admin.
Like with the dashboard, all of the meta boxes can be disabled via the top right Screen Options link, but removing it via our plugin will ensure a consistent experience for our admin users.
<?php

    /* Remove Meta Boxes*/
    function example_remove_meta_boxes() {
    remove_meta_box( 'tagsdiv-post_tag', 'post', 'normal' ); // Tags
    remove_meta_box( 'formatdiv', 'post', 'normal' ); // Format
    remove_meta_box( 'trackbacksdiv', 'post', 'normal' ); // Trackbacks
    remove_meta_box( 'commentstatusdiv', 'post', 'normal' ); // Status
    remove_meta_box( 'commentsdiv', 'post', 'normal' ); // Comments
    remove_meta_box( 'revisionsdiv', 'post', 'normal' ); // Revisions
    remove_meta_box( 'authordiv', 'post', 'normal' ); // Author
    remove_meta_box( 'slugdiv', 'post', 'normal' ); // Slug
    remove_meta_box( 'postcustom', 'post', 'normal' ); // Custom Fields

    // Remove the Beans meta boxes from the post and page edit screens.
    beans_remove_action(  'beans_do_register_term_meta' ); // Posts
    beans_remove_action(  'beans_do_register_post_meta' ); // Pages

}
add_action( 'admin_menu', 'example_remove_meta_boxes' );
Copy
The above function makes use of the remove_meta_box() function, which accepts the meta box id, the page the meta box is displayed on and the context.
I'm also using Beans to remove the Post Options meta box, which lets you set the layout on a per page basis. Great feature, but if it's not being used there is no point displaying it.
Here is the revised post editor page - lean and mean!
Replace the default post editor
Now we're going into plugin territory and the first thing we're going to look at pimping out is the post editor - arguably the most important part of the WordPress admin. I should point out that Gutenberg (the re-imagined writing experience for WordPress is on it's way, which would likely render this step unnecessary.
But for now...
Say hello to to the Markdown Editor (which I'm using to write this post)!
Once installed, the plugin replaces the default editor with a minimal markdown editor, which supports beautiful full screen mode, split screen and of course markdown.
Here is how the editor looks with the plugin enabled:
and here is how it looks in full screen:
and lastly how it looks in split mode:
There are however a few gotcha's with this one. When first installing the plugin, you'll likely get a message saying "The plugin does not have a valid header" but you can bypass it by going be to /wp-admin and activating the plugin manually. There is also no auto-save yet, so be sure to save your posts frequently.
Remove all traces of the blog
Not all clients need/want a blog and in those cases I like to remove all trace of everything relating to the blog. I used to do this manually via my site plugin, but these days I tend to the use the Disable Blog plugin. Simply enable and whoosh, the blog is gone. Then if the client later decides they do want a blog, you simply re-enable and everything goes back to how it was.
That's it for this time!
I hope you learnt something new from the tutorial and big thanks again to 000webhost for being the first sponsor.
If anyone else is interested in sponsoring a tutorial (priced at $300 per tut), send an email to chris [at] smokeyfro [dot] com.
Some of the topics I have in mind are:
- Creating simple white-label plugins for your clients
- Client friendly landing pages using sections
- Attaching fields to specific pages using the Beans Fields API
- Pimping out your Beans 404 error page
- Improve the search experience on your Beans based site
- Getting fancy with relational posts with Beans
- How to create a responsive video gallery using Beans
- Create a simple plugin to display your Team using Beans
- How to create custom shortcodes for your clients
- Examples of different header and footer styles for your Beans based site
- Create a dynamic Hero using the featured image
- Create a kickass contact page with Contact Form 7 and Beans
- Thinking outside the box with FontAwesome and Beans